Summary
| Overall: |      |
| Configuration: |      |
| OnSIP Testing: |      |
| Voice Quality: |      |
| Ease of Use: |      |
Quick Specs
- 3.5" TFT (320 x 240)
- 12 lines or speed dial keys
- Up to 3 expansion modules
Pros
- Up to 12 line registrations
- 3.5" LCD screen, BLF
- HD sound quality (speaker and handset)
- Power over Ethernet
Cons
- 10/100 Ethernet ports
Note: The VVX 400 has since been discontinued.
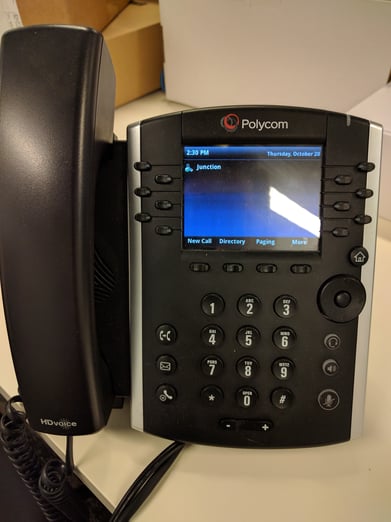
The Polycom VVX 400 is a mid-range phone with a color 3.5” LCD screen and 12-line display. The layout is designed to streamline call management. The VVX 400 features all the functions you'd expect to find in a modern desk phone, including call transfer, conferencing, hold, and mute, along with business VoIP staples such as HD voice.
On paper, the Polycom VVX 400 sounds like a solid mid-level device for office workers. But would it live up to our expectations? We took the phone for a test drive to find out.
First Impressions
The Polycom VVX 400 is very well designed. The matte color and size make the VVX 400 look good without eating up too much desk space. You can adjust the height to three different levels. The color LCD screen also helps to anchor the phone and gives ample space when it comes to monitoring lines and users.
The phone has a 12-key dial pad and hard keys for different call functions. The hard keys are well placed and well apportioned, making call handling much easier. There's a Select button that acts as a navigator key and a home button that brings you the Menu section of the phone. You’ll see settings, messages, directories, DND, forward, and intercom functions as quick access buttons below the screen.

There are three expansion modules on the phone, as well as two Ethernet ports: one for a network and one for a computer with PoE (10/100). For comparison, the next iteration in the Polycom phone line, the VVX 410, has gigabit Ethernet ports. As such, we listed the Ethernet ports under “Cons” on the sidebar because we felt the phone could have benefited from more gigabit ports.
Features
The Polycom VVX 400 has 12 lines and is capable of registering up to 12 SIP accounts. The 12 lines can act as account registrations or as Busy Lamp Fields for monitoring your colleagues’ phone availability. Notifications are present on the screen, indicating whether you have missed calls or voicemails. These appear on the top right of the LCD screen, along with an LED indicator on the phone itself.
The VVX 400 is compatible with IPv6 networks. You can choose which IP version to use, or you can enable both. We preferred using IPv4 in our testing. The VVX 400 also has a host of other business phone features that include:
- Call timer and call waiting
- Call transfer, hold, forward, pickup
- Called, calling, connected party information
- Local three-way audio conferencing
- One-touch speed dial and redial
- Codecs: G.711 (A-law and μ-law), G.729AB, G.722.1, iLBC, Opus
- Busy lamp field
- Multilingual user interface
- Media encryption via SRTP
- Remote missed call notification
- Do not disturb function
- Voice Quality
Voice Quality
The Polycom VVX 400 has excellent voice quality. We tested it with other VoIP phones and landline phones; both yielded top-rate responses. The VVX 400 is marketed as a mid-range phone, but its voice quality keeps up with the best models around. We were also impressed with how clear the speakerphone was. Normally, the speakerphone usually suffers because the person is farther away from the receiver. With the VVX 400, the voice quality sounded like it remained HD throughout our calls.
Compatibility Testing
At OnSIP, we put each of the phones we use through a multi-step interoperability test in which we apply ~30 test cases. An example of a test case would be the following:
Test phone calls phone B
B picks up
B puts test phone on hold
B calls phone C
C picks up
B transfers test phone to C
Call must be transferred correctly to C. B must be released correctly after the transfer. When C picks up, audio must work in both ways between test phone and C. When test phone is on hold, there is no audio between it and phone B.
The Polycom VVX 400 passed all of our compatibility testing.
OnSIP Setup
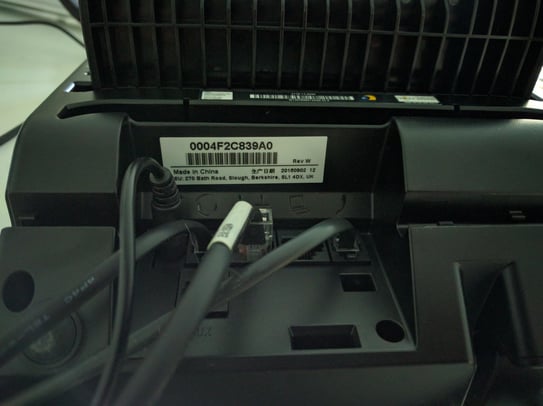
Step 1: Locate the MAC address.
You can flip your phone over to find your MAC address:

Or you can press "Menu" on the Polycom VVX 400 home screen. Then press "Status" (2), "Platform" (1), and "Phone" (1).
The "S/N:" field is your MAC address. It should start with "0004f2" and be a total of 12 digits.
Step 2: Add the MAC address to the OnSIP Admin Portal.
Depending on the type of phone you have, you will need to follow slightly different procedures for each type: existing, new, or used.
Existing OnSIP Phone - New User
- Reassign the phone to new user in the OnSIP Admin Portal from the drop-down menu.
- Reset key in the Factory Reset box.
- Reset Local Configuration (see here).
- Reboot phone.
Brand-New Phone
- Add the MAC address of the phone to OnSIP Admin Portal under "Resources" and assign a user (see here).
- Add boot server info to phone (see below).
- Reboot phone.
Used Phone (From Another Provider)
- Reset Device Configuration (see here).
- Reboot phone.
- Reset Local Configuration (see here).
- Reboot phone.
- Reset Web Configuration (see here).
- Reboot phone. (The phone is now in the same state as a brand new phone.)
- Add the MAC address of phone to OnSIP Admin Portal under "Resources" (see here).
- Add boot server info to phone (see below).
- Reboot phone.
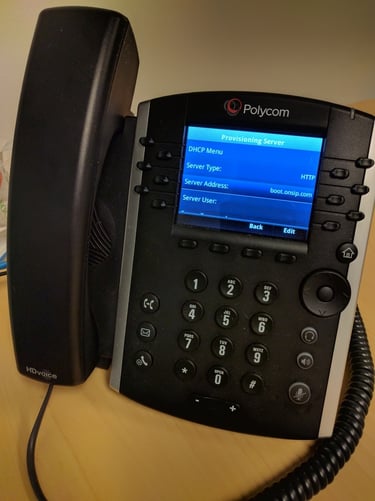
Step 3: Add boot.onsip.com.
On the Polycom VVX 400, press the "Menu" button. Then choose "Settings" (3), and "Advanced" (2). Enter your password; the default password is “456.” Hit the "Enter" soft key when done.
Next, select "Admin Settings" (1), followed by "Network Configuration" (1).
Scroll down until you see "Prov. Server..." and select that option.

In the "Server Menu," change "Server Type" to "HTTP" and the "Server Address" to boot.onsip.com, using the * key for the periods. Hit "okay" to save. Select "Back"/"Exit" (or use the left directional key) and press the "Save Config" option.
Final Thoughts
Here's the plainest way of putting it: The Polycom VVX 400 is a great phone. With solid features and impressive voice quality, the VVX 400 is about the best you can do for a mid-range office phone. The LCD screen is also a major plus. The speakerphone stands out when compared to other similar models and has a broad array of codec options, including Opus. Finally, the price is very reasonable when compared to other similar phones on the market.
Our only real complaint was that the VVX 400 doesn't have gigabit Ethernet ports. But if you're looking for a mid-range office phone that can get the job done, the Polycom VVX 400 should be near the top of your list.

